UC San Diego • PHYS 124:
Syllabus • Lectures • Assignments • Lab info • Docs • 3D Print • Projects
Notes courtesy of Darius Choksy. Your feedback is appreciated.
3D printing
We have a Maker Ultimate 3D – MK11 DirectDrive Extruder that uses deposition modeling to create parts. It does this by melting a plastic filament and extruding it through a nozzle.
3D printing basics
http://www.makeuseof.com/tag/beginners-guide-3d-printing/
How to Print in just… 14 steps 😀
1. Create your model in Inventor.
2. Set document units to mm.
3. Access 3D print in Inventor (can be reached by searching) and make sure the print orientation is correct.
4. Use STL to export the file, make sure units are using the source units.
5. Open CURA and adjust print settings (described in the article above).
6. Check time to print, this will be accurate on CURA but inaccurate on the printer.
7. Check the mass of the print and make sure it is reasonable considering the part volume and density of plastic and density of fill.
8. Check that enough filament is present to print your part.
9. Save part via “Save toolpath” to an SD card.
10. Insert SD card into printer.
11. Go into print and select your file then hit print.
12. The nozzle will extrude plastic to clear itself and clean itself by pushing into the corner, this is normal.
13. Once the part is printed use the spatula to scrape it off.
14. Break off the raft or brim from the part and clear out structure material.
Materials Ultimate is capable of printing
ABS, PLA, XT Copolyester,
PET, TPU, TPC, FPE, PVA,
HIPS, Jelly, Foam, Felty
3D printing tips
Check the 3D printing reddit especially for problems that would take multiple iterations to figure out.
Increase density of the print to increase strength.
To create completely solid parts overmelt the material (10 degrees seems to work but may be too hot), as well as overextruding the material. This fills in the gaps between printed lines.
When printing something thin use PLA as ABS warps. ABS also is more likely to warp with 100% fill due to forced from the inside cooling. This can also happen with PLA but is much less noticeable.
CURA set up code
When installing CURA (or afterwards) add a custom printer with the settings shown in the next image (click to enlarge):
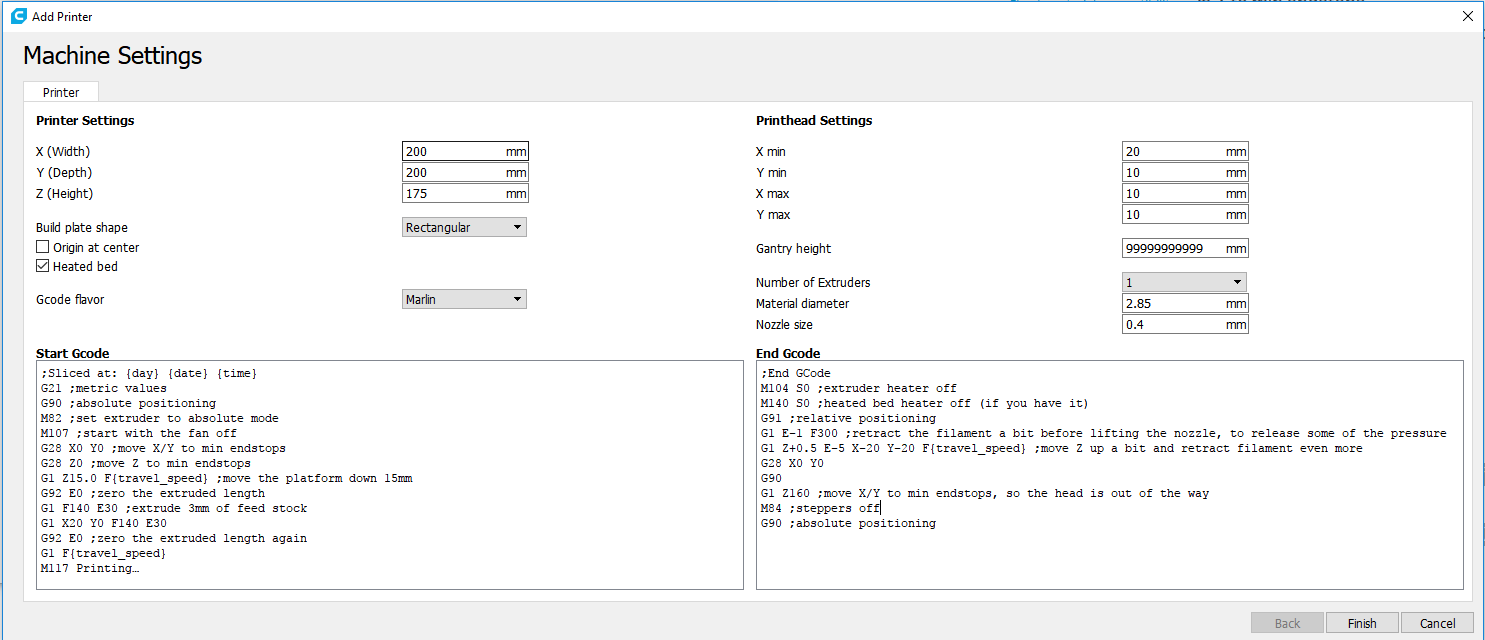
The “Start Gcode” and “End Gcode” settings shown in the image are the following:
start.gcode:
;Sliced at: {day} {date} {time}
G21 ;metric values
G90 ;absolute positioning
M82 ;set extruder to absolute mode
M107 ;start with the fan off
G28 X0 Y0 ;move X/Y to min endstops
G28 Z0 ;move Z to min endstops
G1 Z15.0 F{travel_speed} ;move the platform down 15mm
G92 E0 ;zero the extruded length
G1 F140 E30 ;extrude 3mm of feed stock
G1 X20 Y0 F140 E30
G92 E0 ;zero the extruded length again
G1 F{travel_speed}
M117 Printing…
end.gcode:
;End GCode
M104 S0 ;extruder heater off
M140 S0 ;heated bed heater off (if you have it)
G91 ;relative positioning
G1 E-1 F300 ;retract the filament a bit before lifting the nozzle, to release some of the pressure
G1 Z+0.5 E-5 X-20 Y-20 F{travel_speed} ;move Z up a bit and retract filament even more
G28 X0 Y0
G90
G1 Z160 ;move X/Y to min endstops, so the head is out of the way
M84 ;steppers off
G90 ;absolute positioning
